This is a step by step tutorial to learn how to install and setup Apache Tomcat on Windows operating system. We are going to use the Tomcat version 8.5.24. We will also deploy an example servlet application to the server.
(1)Downloading Download Apache tomcat from this link. Click on the zip file link to download: 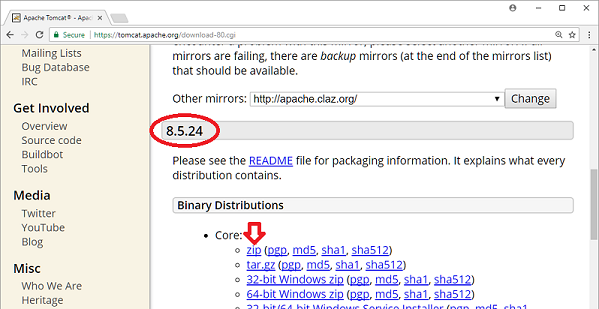
(2)Extracting Unzip the downloaded file (I used 7-Zip) to a convenient location. I extracted it at C:\\ C:\apache-tomcat-8.5.24\apache-tomcat-8.5.24>dir
Volume in drive C is OS_Install
Volume Serial Number is 7844-2D90
Directory of C:\apache-tomcat-8.5.24\apache-tomcat-8.5.24
11/27/2017 01:33 PM <DIR> .
11/27/2017 01:33 PM <DIR> ..
11/27/2017 01:31 PM <DIR> bin
11/27/2017 01:31 PM <DIR> conf
11/27/2017 01:31 PM <DIR> lib
11/27/2017 01:31 PM 58,153 LICENSE
11/27/2017 01:30 PM <DIR> logs
11/27/2017 01:31 PM 1,774 NOTICE
11/27/2017 01:31 PM 7,316 RELEASE-NOTES
11/27/2017 01:31 PM 16,722 RUNNING.txt
11/27/2017 01:31 PM <DIR> temp
11/27/2017 01:31 PM <DIR> webapps
11/27/2017 01:30 PM <DIR> work
4 File(s) 83,965 bytes
9 Dir(s) 29,555,326,976 bytes free
(3)Setting Username/password Go to the conf directory: C:\apache-tomcat-8.5.24\apache-tomcat-8.5.24\conf>dir
Volume in drive C is OS_Install
Volume Serial Number is 7844-2D90
Directory of C:\apache-tomcat-8.5.24\apache-tomcat-8.5.24\conf
01/08/2018 11:53 PM <DIR> .
01/08/2018 11:53 PM <DIR> ..
01/08/2018 11:53 PM <DIR> Catalina
11/27/2017 01:31 PM 14,101 catalina.policy
11/27/2017 01:31 PM 7,528 catalina.properties
11/27/2017 01:31 PM 1,368 context.xml
11/27/2017 01:31 PM 1,172 jaspic-providers.xml
11/27/2017 01:31 PM 2,365 jaspic-providers.xsd
11/27/2017 01:31 PM 3,692 logging.properties
11/27/2017 01:31 PM 7,678 server.xml
11/27/2017 01:31 PM 2,208 tomcat-users.xml
11/27/2017 01:31 PM 2,691 tomcat-users.xsd
11/27/2017 01:31 PM 174,021 web.xml
10 File(s) 216,824 bytes
3 Dir(s) 29,547,409,408 bytes free
Open tomcat-user.xml in notepad: C:\apache-tomcat-8.5.24\apache-tomcat-8.5.24\conf>notepad.exe tomcat-users.xml
Add followings at the end (change username and password as you wish):
<tomcat-users>
 .....
 <role rolename="manager-gui"/>
 <user username="joe" password="123" roles="manager-gui"/>
</tomcat-users>
(4)Starting the server Go to the bin directory: C:\apache-tomcat-8.5.24\apache-tomcat-8.5.24\bin>dir
Volume in drive C is OS_Install
Volume Serial Number is 7844-2D90
Directory of C:\apache-tomcat-8.5.24\apache-tomcat-8.5.24\bin
11/27/2017 01:31 PM <DIR> .
11/27/2017 01:31 PM <DIR> ..
11/27/2017 01:31 PM 34,738 bootstrap.jar
11/27/2017 01:31 PM 1,703 catalina-tasks.xml
11/27/2017 01:31 PM 15,815 catalina.bat
11/27/2017 01:31 PM 23,315 catalina.sh
11/27/2017 01:31 PM 207,125 commons-daemon-native.tar.gz
11/27/2017 01:31 PM 25,145 commons-daemon.jar
11/27/2017 01:31 PM 2,040 configtest.bat
11/27/2017 01:31 PM 1,922 configtest.sh
11/27/2017 01:31 PM 8,509 daemon.sh
11/27/2017 01:31 PM 2,091 digest.bat
11/27/2017 01:31 PM 1,965 digest.sh
11/27/2017 01:31 PM 3,574 setclasspath.bat
11/27/2017 01:31 PM 3,680 setclasspath.sh
11/27/2017 01:31 PM 2,020 shutdown.bat
11/27/2017 01:31 PM 1,902 shutdown.sh
11/27/2017 01:31 PM 2,022 startup.bat
11/27/2017 01:31 PM 1,904 startup.sh
11/27/2017 01:31 PM 48,595 tomcat-juli.jar
11/27/2017 01:31 PM 405,109 tomcat-native.tar.gz
11/27/2017 01:31 PM 4,574 tool-wrapper.bat
11/27/2017 01:31 PM 5,483 tool-wrapper.sh
11/27/2017 01:31 PM 2,026 version.bat
11/27/2017 01:31 PM 1,908 version.sh
23 File(s) 807,165 bytes
2 Dir(s) 29,508,325,376 bytes free
Run startup.bat C:\apache-tomcat-8.5.24\apache-tomcat-8.5.24\bin>startup.bat
Using CATALINA_BASE: "C:\apache-tomcat-8.5.24\apache-tomcat-8.5.24"
Using CATALINA_HOME: "C:\apache-tomcat-8.5.24\apache-tomcat-8.5.24"
Using CATALINA_TMPDIR: "C:\apache-tomcat-8.5.24\apache-tomcat-8.5.24\temp"
Using JRE_HOME: "D:\Java9\jdk-9"
Using CLASSPATH: "C:\apache-tomcat-8.5.24\apache-tomcat-8.5.24\bin\bootstrap.jar;C:\apache-tomcat-8.5.24\apache-tomcat-8.5.24\bin\tomcat-juli.jar"
A new console will popup and will start the server: 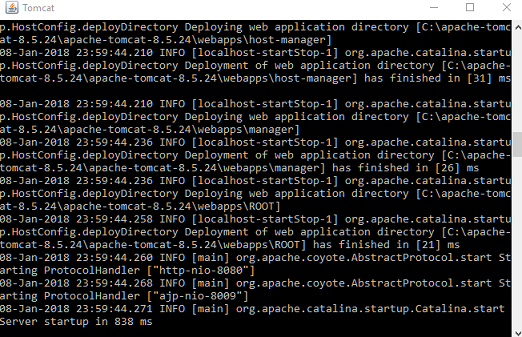
(5)Accessing Web Admin page Open page in your browser at localhost:8080 and click on Manager App: 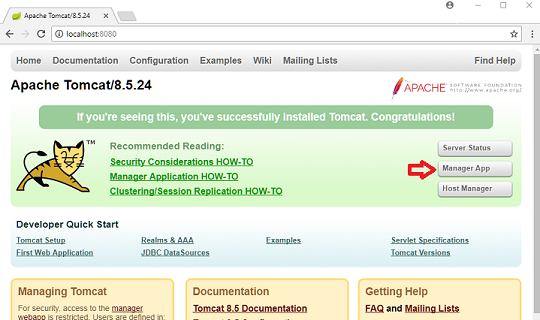 Enter your username/password: 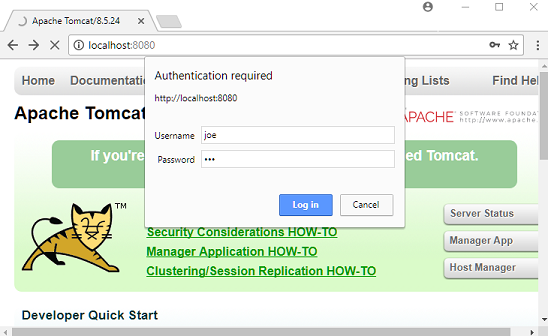 Now you will see Application Manager page where you can deploy your wars: 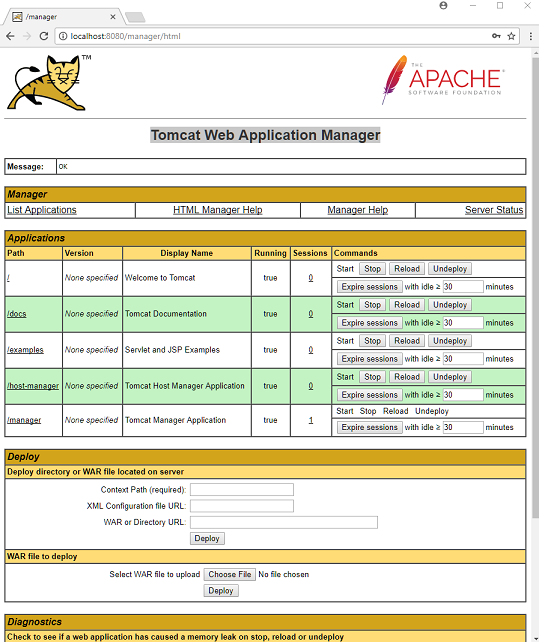
(6)Deploying a test Servlet Web Application Create a servlet as shown (the complete application is included in the project browser below): @WebServlet(urlPatterns = "/hello")
public class HelloWorldServlet extends HttpServlet {
@Override
protected void doGet(HttpServletRequest req,
HttpServletResponse resp)
throws ServletException, IOException {
PrintWriter writer = resp.getWriter();
writer.write("Hello World!");
}
} Install the application:
C:\servlet-hello-world>mvn package
It will create 'servlet-hello-world-1.0-SNAPSHOT.war' under maven's 'target' folder. We are going to deploy this war file to the tomcat server. Go to the admin page again and click on 'Choose File' and select your war file: 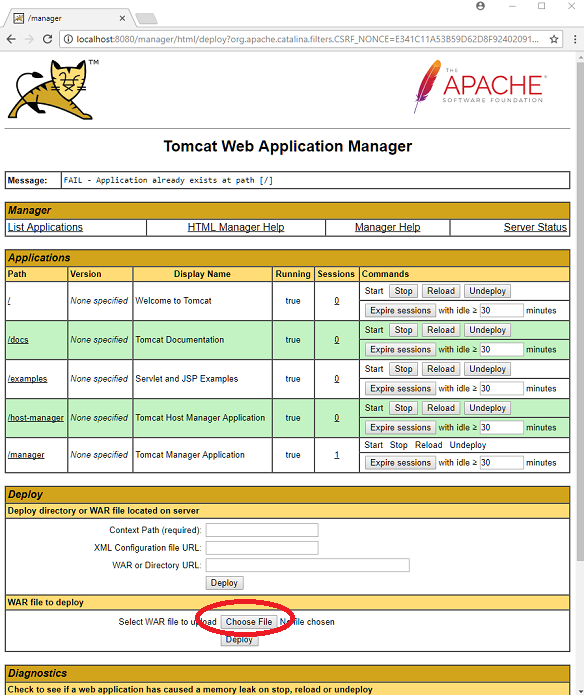 After selecting your war file, click on the 'Deploy' button (the one next to the 'Choose File' button). Now you will see your war in the 'Application List' 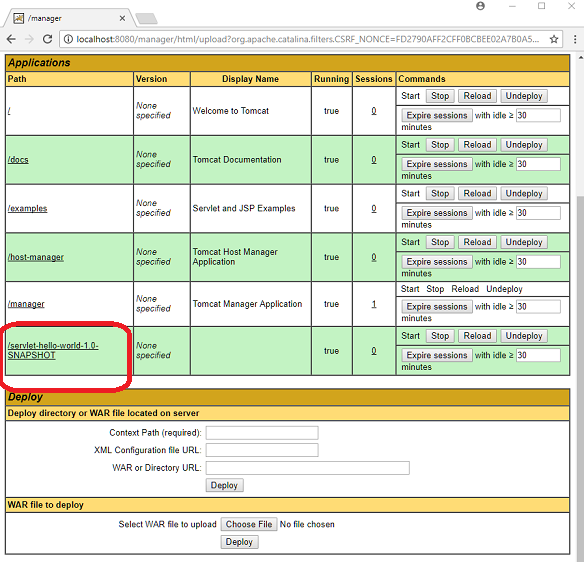 Now you can access your application at 'http://localhost:8080/servlet-hello-world-1.0-SNAPSHOT/hello' 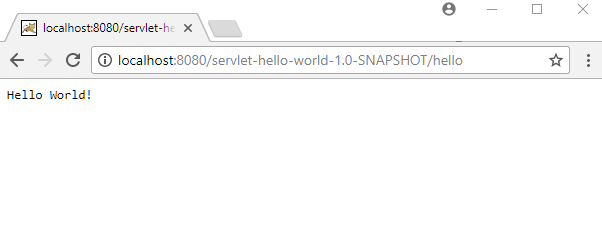 Also check out how to deploy war using tomcat-maven-plugin here.
Example ProjectDependencies and Technologies Used: - javax.servlet-api 3.1.0 Java Servlet API
- JDK 1.8
- Maven 3.3.9
|
|


